Sling Mounting Tool Rental
The most difficult aspects of seating sling replacement are (a) stretching the sling fabric to its full length and width, and (b) replacing the spreader bars that help to keep the sling fabric taut between the side rails.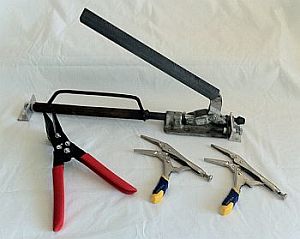
To help with this task, we have made available our sling fabric stretching and sling rail spreader tools. As shown in the picture, the tool set includes:
- A lever-action spreader device that is adjustable for use with just about any sling chair rail type.
- A pair of wide-mouth pliers to grip and stretch the sling fabric fully to the ends of the rails.
- Two narrow-mouth vice grips to hold the fabric in place while tightening the mounting bolts.
Rental Fee
The sling tools are available for rent for $45 per week. You are required to place a $200 deposit when renting them, and when they’re returned to us in good condition, we will refund you the difference after deducting the rental price, based upon the length of time you have had the tool in your possession and in transit.
The above does not include shipping & handling charges, which are additional. We always ship via FedEx ground to enable tracking. Return shipment is at your expense also.
Note that if the tool is returned damaged, or is not returned, your deposit will be forfeited and no refund will be given. We strongly advise return shipping by a trackable, insurable method, such as FedEx or UPS.
How to Use the Spreader Tool
Get the best performance and reduce the risk of damaging the tool by following the steps below during your replacement sling project. The stretching task is much easier if two people work together.
- First watch this video which shows all the tools being used in a sling furniture factory.
- The last step before using the spreader tool is to tighten the fastening bolts fully.
- Now you start using the spreader tool.
Lie the chair down so the back of the sling and rails are exposed, and position the spreader tool close to the holes where the first spreader bar will be inserted (see picture). - Open the spreader tool by raising the lever.
- If necessary, adjust the tool’s length by screwing the nut at the tail end [the single nut].
Important: The tool should NOT be adjusted such that the lever is fully open. This will place too much strain on the tool and may break it, and also make it too hard for you to press the lever down.
Hint: If the tool is too long, remove the tail end assembly altogether, and place a rag between its end and the frame to prevent scratching the frame. If the tool is too short, use a small block of wood between it and the frame to extend its range.
- When the tool is in place and in alignment, slowly compress the lever. This causes the base of the tool to expand, pushing your side rails apart. Expand the rails only enough to insert the spreader bars.
- If your spreader bars are the curved steel type, you may need to bend them more to make them smaller. Then after the ends are positioned in the holes in the side rails, and with the spreader tool still in place, use a wooden mallet or heavy block of wood to hit the curved spreader bar to straighten it out again. Sounds primitive, but it works!
If you have questions during the use of the spreader tool, please contact us.
How to measure How to remove How to install Sling fabrics Place an order Sling replacement service