How to Replace Vinyl Strap on Patio Furniture Using Metal Clips
Here’s what you need to know before beginning your patio furniture repair project. Installing vinyl strapping is not difficult, but it is tricky! So before you even order your replacement vinyl straps, read this document carefully. Each picture is explained below.
The pictures show strapping using E-clips on a ⅝” square frame. The same principles apply for all metal clips.
Figure 1: Using a pair of garden shears cut off all old straps and fasteners. Clean the piece well. If the furniture is in need of structural repair or painting this is the time to do it.
IF YOU ARE USING PRE-CUT STRAPS, SKIP TO FIGURE 5
Figure 2: Using a cloth measuring tape, find the exact measurement from hole to hole, making sure to go around the outside of the frame.
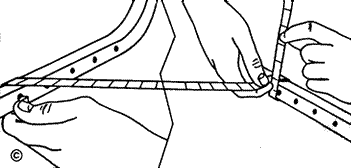
Figure 3: Do a test: Subtract approximately 10% to 12% from the measurement obtained in Fig. 2. Cut one strap off your roll of vinyl. (Do not cut all the straps at once as you will probably need to adjust the strap length after seeing how the first strap fits around the frame).
For example: Exact measurement hole to hole comes to 25”; deduct 10-12% (2½” to 3”). Cut Straps to 22″”. MORE ABOUT LENGTH ADJUSTMENT
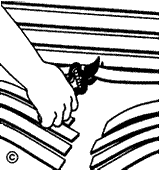
Figure 4: Using garden shears, trim off the corners on each end of the vinyl straps.

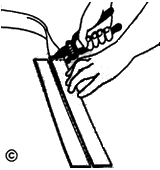
Figure 5: Insert strap end fully into the jaws of the clip. Using a pair of vice-grips or similar, apply heavy clamp pressure to secure strap in jaws of clip. A good method is to clamp halfway onto clip from one side, then repeat on the other side. Two bites seem to secure strap better than one single effort.

Figure 6: The vinyl straps must be heated and stretched over the furniture frame. If continuous strapping is anticipated a pair of golf gloves will help reduce finger burn caused by handling the heated straps. In addition you may want to wrap some adhesive tape around the top of your thumb and index finger for a bit more insulation before you put on the gloves.
Using a hot plate or other heat source boil a large pot of water. Once the water has come to a boil insert several straps with fasteners inserted. Reduce heat so water remains very hot but not boiling. Allow straps to stay in water at least 2 minutes. Leaving them in longer will not hurt them. Remove one strap and (optionally) quickly dry with towel.
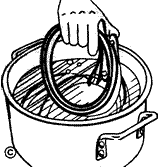
Figure 7: (Back view) Slide the E-Clip with the strap attached onto the frame from the front.
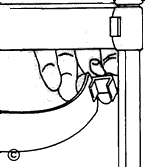
Figure 8: (Front view) Clip attached to frame.
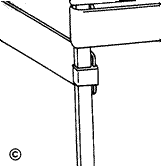
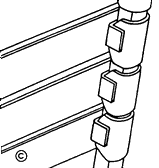
Figure 9: (Front view) Wrap the strap tightly around itself, covering the clip as you bring the strap around the
outside of the frame.
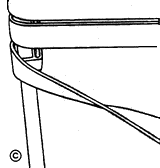
Figure 10: (Front view) Stretch the strap firmly across the frame at an angle about two or three inches above or
below the strap’s proper placement on the frame. Stretch until you have pulled about four to five inches past the
frame.
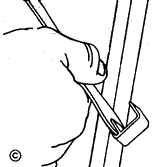
Figure 11: (Front view) Using heavy thumb pressure of one hand, hold the strap in position and begin wrapping the
strap around the frame with your other hand. Slide the clip onto the frame.
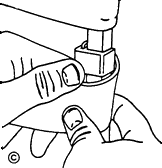
Figure 12: Pull the strap back and in an upward motion to bring the top wrap over the bottom wrap.

Figure 13: Back view of finished product.
FAQ’s How to measure Color chart Vinyl strap Fasteners Videos Restrap service