Seating Sling Replacement Instructions
Just as there are several ways to remove fabric slings from outdoor patio furniture frames, there is more than one way to replace them. The steps shown below are almost the reverse of the procedure for removing the slings.
Let’s take a typical chair as an example. Similar design and construction are used for all types of sling patio furniture, so pretty much any other type of sling can be replaced using the same principles. Please read the steps below completely before starting your sling replacement project.
This new video takes you through seating sling installation the way the professionals do it. A few tools are used that you may not find in your workshop, but there are more ways than one to achieve the same results. We suggest you watch the video several times until you grasp all the tricks!
2 mins 45 secs
Follow these steps to install seating slings
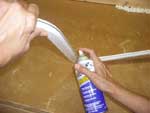
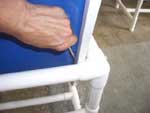
[1] Lubricate the Rails
There is a lot of friction involved when dragging a sling fabric through the side rail channels. First lubricate the channels with soapy water to make the job easier. Another option that works well is to rub a cake of bar soap over the edges of the sling, where the spline is located. CAUTION: Don’t use WD-40 as in this picture!
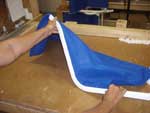
[2] Insert the Sling into the First Channel
Feed one end of the sling into the channel of the first side rail. Obviously, the hemmed edges should be behind/under the chair. Note: Do not cut the plastic spline to length until after the sling is completely installed.
[3] Sling Fully Inserted
When the sling is inserted into both side rails, it should look something like this.

[4] Do Not Trim the Splines
The ends of the splines should be left sticking out of the channels, because they tend to move when stretching the sling fabric in the side rails. Cut them off later.
[5] Mount the Sling Rails into the Frame
Start by loosely bolting one of the side rails into position. Screw the bolts/nuts only enough to hold the rails in position so the other side can be mounted before tightening
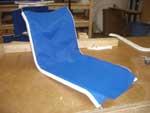
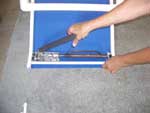
[6] Stretch the Sling and Tighten the Bolts
It is recommended to use a tool to spread the sling rails, so the bolt threads don’t get stripped. Use a pair of pliers to stretch the sling fabric from top to bottom in their channels, then gradually tighten each nut or bolt in turn, a little at a time for each one. Note: Make sure the sling remains stretched so it reaches both ends of the rails. You cannot stretch the fabric after the side rail bolts are tightened.
[7] Insert the Spreader Bars
This can be the most difficult stage of replacing your slings. We have a spreader tool for rent to make this easier, but another option is to use two pieces of 2×4, cut long enough so together they are the right length, with a hinge attached in the middle. You can also purchase a sash clamp with a reversible end to make it push out instead of in.
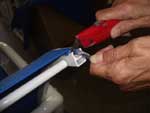
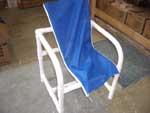
[8] Trim the Splines
Now you can cut off any excess spline. Make sure it is trimmed flush with the end of the side rail, or even shorter, so the end caps will insert fully.
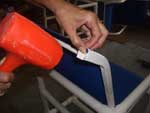
[9] Replace the End Caps
Using a plastic or wooden mallet, tap the end caps back into position on the ends of the side rails.
How to measure How to remove Sling fabrics Place an order Tool rental Sling replacement service